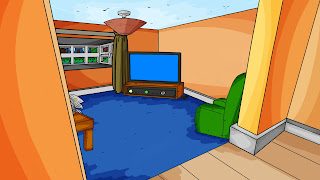
I made this background to practice and determine the overall direction I'd like to take for the scenery. This is just a jpeg of the background I made, the actual file has been composed in such a way that it can work with parallaxing on After Effects. I'll be making a demonstration of that, including a moving character within the scene. There will be changes to various colours, shades, and brush sizes in the final version of this background.
As it will help with my art direction, I'll be making another background in a similar style, while talking through the process.
Step 1: (this part's optional)

Step 2:

With a clear enough idea on the perspective and layout of the area, I then trace over the layer below, while adding minor elements to the scene, using a black simple circle brush - size 4px, pressure off.
Step 3:

Next, I add a solid colour to the layers below the line art layers.
Step 4:

Above the solid colour layers, I make a multiply layer and add a shade to certain parts of the scenery. I use the the same shade of colour from the solid colour layer for this. I then merge this layer with the Solid Colour layer.
Step 5:

I add textures to the scenery on another layer.
Step 6:

Next, I add extra shades by using two multiply layers, both at 50% opacity.
Step 7:

I'll add the rest of the well-needed details and colour/shade them just like the previous steps, and I'll avoid shading the less significant details, like the skirting boards or that light switch.
Step 8:

Finally, I'll organise the layers into groups so that as I'm compositing the scene in After Effects, I can convert them into 3D layers, which helps characters move in front of and behind the layers, as well as paralaxing.
No comments:
Post a Comment